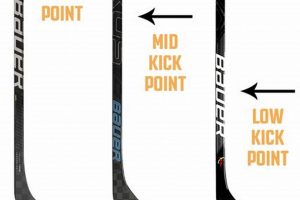
The location along a hockey stick’s shaft where it bends the most when a player applies force prior to a shot significantly influences the shot’s characteristics. This area of maximum flex directly impacts how quickly and powerfully the puck is released. For example, a stick that bends closer to the blade facilitates quicker puck release, while one that flexes higher up the shaft tends to generate more power.
The position of this flex area is critical because it determines how efficiently a player transfers energy from their body into the stick and ultimately into the puck. Its design is a crucial factor in optimizing a player’s performance, allowing for tailored shot profiles that suit individual playing styles and game situations. Historically, stick manufacturing techniques have evolved to offer variations in this characteristic, enabling players to choose equipment that best matches their needs. These different designs offer advantages in various scenarios on the ice, impacting shot velocity and release time.
Understanding this aspect of stick design is paramount when considering factors such as player height, strength, and preferred shooting style. Therefore, further discussions will delve into the different types available, the specific advantages and disadvantages of each, and how to select the most suitable option for enhancing on-ice performance. These considerations are key to maximizing a player’s shot potential and overall game effectiveness.
Tips Regarding Stick Flex Location
Selecting a hockey stick involves careful consideration of several factors. The location of maximum flex is paramount. These guidelines aim to provide insights for informed decision-making.
Tip 1: Consider Player Height and Strength: Taller and stronger players generally benefit from a mid- or high-flex point, as they can generate the necessary force to maximize energy transfer. Shorter, lighter players may find a low-flex point more advantageous for quicker release.
Tip 2: Evaluate Shooting Style: Players who frequently take quick snapshots and wrist shots often prefer a low-flex point for its rapid release. Those who rely on powerful slap shots and one-timers may find a mid- or high-flex point more suitable for generating maximum power.
Tip 3: Test Different Flex Profiles: Whenever possible, test different sticks with varying flex profiles on the ice. Observe how each impacts shot velocity, accuracy, and release time. Personal preference plays a significant role in selecting the optimal configuration.
Tip 4: Analyze Puck Trajectory: The flex area impacts the puck’s trajectory. A lower area tends to produce a lower, quicker shot, while a higher area may result in a shot with greater elevation. Select a configuration that aligns with preferred shooting tendencies and scoring strategies.
Tip 5: Account for Game Situation: The ideal characteristic might vary depending on the game situation. A lower bend point can be advantageous for quick shots in tight spaces, while a higher one may be preferred for clearing the zone or taking long-range shots.
Tip 6: Recognize the Impact on Stick Handling: The bending profile can influence stick handling ability. Sticks with a softer flex point may provide enhanced puck feel and control, while stiffer sticks offer increased stability for powerful shots.
Proper selection is crucial for maximizing on-ice performance and minimizing the risk of injury. Experimentation and careful evaluation are essential to finding the ideal configuration.
With these considerations in mind, the next section will address common misconceptions and frequently asked questions related to stick flex characteristics.
1. Flex Profile
The flex profile of a hockey stick is intrinsically linked to its bending area and fundamentally dictates its performance characteristics. It governs how and where the shaft will bend when a player applies force, thereby affecting the energy transfer, shot velocity, and release speed. Understanding this profile is essential for selecting equipment optimized for individual playing styles and skill sets.
- Flex Point Location
This is the most direct manifestation of the flex profile. The precise location along the shaft where the stick is designed to bend most profoundly defines whether it is considered a low, mid, or high-flex stick. For example, a low-flex point, positioned closer to the blade, generally allows for a quicker release of the puck, while a high-flex point, located nearer the top of the shaft, typically generates greater power, particularly for slap shots. The physical position dictates the type of shot most effectively executed.
- Stiffness Distribution
Beyond the primary flex point, the distribution of stiffness along the entire length of the shaft is a crucial component of the flex profile. Some sticks feature a uniform stiffness taper, while others incorporate variable stiffness zones to optimize energy loading and release. An example is a stick with a softer lower shaft for improved puck handling coupled with a stiffer upper shaft for enhanced power transfer. This distribution directly affects both control and potential shot power.
- Torsional Rigidity
While the primary focus is on the bending of the shaft, the torsional rigidity, or resistance to twisting, also contributes to the overall flex profile. High torsional rigidity ensures that the energy generated is efficiently channeled towards the puck without being lost through unwanted deformation. Consider a scenario where a player is taking a wrist shot; a stick with high torsional rigidity will provide a more direct and accurate transfer of energy, resulting in a more precise shot.
- Kick Point Response
This refers to how the stick reacts once the stored energy is released. The flex profile influences the speed and manner in which the stick recoils, propelling the puck forward. A responsive flex profile enables the player to maintain control throughout the shooting motion and achieve a desired trajectory. For instance, a stick with a rapid recoil can lead to a quicker, more deceptive shot release, advantageous in close-quarters situations.
In conclusion, the interplay of these componentslocation, stiffness distribution, torsional rigidity, and responsecharacterizes the flex profile and dictates the overall performance characteristics. The ability to understand and match this profile to individual player needs is central to optimizing on-ice performance. The different combinations within this profile allows for specialized sticks and specialized shooting.
2. Energy Transfer
The efficacy of energy transfer in a hockey stick system is intrinsically linked to the placement of its bending area. This location dictates how efficiently a player’s applied force is converted into kinetic energy propelling the puck. A properly positioned bending area maximizes this transfer, leading to greater shot power and velocity. Conversely, an ill-suited bending area can result in energy dissipation, diminishing shot effectiveness. For instance, a player exerting force on a stick with a high bending area will compress the shaft, storing potential energy. This stored energy, when released, accelerates the puck. The bending area acts as a fulcrum, influencing the magnitude of the force applied to the puck. Without an optimal position, the energy transfer will be reduced.
The significance of optimized energy transfer becomes apparent in specific game scenarios. Consider a defenseman executing a slap shot from the blue line. The high bending area of the stick allows for maximum energy loading during the wind-up, resulting in a forceful release of the puck toward the net. Alternatively, a forward executing a quick wrist shot in close proximity to the goal requires a stick with a lower bending area. This configuration facilitates a rapid transfer of energy, enabling a swift release of the puck before the goaltender can react. These examples illustrate the practical implications of matching stick design to playing style and game situations. An optimal configuration is crucial to the power and speed of shooting.
In summary, energy transfer is a critical component of the overall stick performance. Matching a player’s physical attributes and preferred shooting style with the appropriate bending area is essential for maximizing shot power, accuracy, and release speed. The strategic importance of understanding this relationship cannot be overstated, as it directly impacts a player’s ability to contribute offensively. The challenges involve finding the specific configuration that maximizes energy transfer for an individual given their own attributes and playing style. The position of the bending area is a key concept that has been adopted by the industry.
3. Shot Velocity
Shot velocity, a critical metric in hockey performance, is significantly influenced by the design and characteristics of the hockey stick, particularly the area of maximum flex. This aspect affects how efficiently a player can transfer energy to the puck, directly impacting its speed upon release. Understanding this relationship is crucial for optimizing equipment selection and enhancing shooting capabilities.
- Location Impact
The physical location of the bending area along the stick shaft directly correlates with shot velocity. A lower position, nearer the blade, facilitates quicker energy transfer, resulting in faster release but potentially reduced power. Conversely, a higher bending area allows for greater energy storage during the loading phase, leading to a more powerful shot, albeit with a potentially slower release. The location therefore determines the balance between speed and force.
- Flex and Stiffness
The overall flex, or stiffness, of the stick, in conjunction with the bending area, dictates the amount of energy that can be stored and released. A stiffer stick requires greater force to bend but can generate higher velocity upon release if the player possesses sufficient strength. A more flexible stick bends more easily, allowing for quicker shots but may sacrifice overall power. The appropriate flex is determined by a player’s strength and shooting mechanics.
- Energy Transfer Efficiency
The efficiency with which energy is transferred from the player to the stick and then to the puck is paramount. A well-designed bending area, coupled with appropriate stick flex, minimizes energy loss during the shooting motion. In contrast, an improperly matched combination can lead to energy dissipation, resulting in a reduction in shot velocity. Efficient energy transfer is essential for maximizing shot effectiveness.
- Shooting Technique Synergy
The bending area must complement the player’s shooting technique. A player who favors quick wrist shots benefits from a stick with a lower bending area, allowing for rapid release and enhanced puck control. A player who relies on powerful slap shots requires a higher bending area to maximize energy loading during the wind-up. Proper technique and equipment synergy are fundamental to achieving optimal shot velocity.
In conclusion, shot velocity is a multifaceted outcome determined by the interplay of the bending area, stick flex, energy transfer efficiency, and shooting technique. Selecting a hockey stick with a bending area that aligns with a player’s physical attributes and shooting style is paramount for maximizing shot velocity and overall offensive performance. An awareness of this relationship enables players to make informed equipment choices that enhance their on-ice capabilities.
4. Release Quickness
Release quickness, a critical attribute in hockey, is directly influenced by the area of maximum flex on a hockey stick. A lower position generally facilitates a faster release. The cause-and-effect relationship is evident: a lower flex position allows for quicker energy transfer from the player to the puck, minimizing the time required for the shot. Release quickness is paramount as it reduces the goaltender’s reaction time, increasing the likelihood of scoring. Consider a scenario where a forward, in tight proximity to the net, receives a pass. A stick with a lower position will enable the forward to shoot the puck with minimal wind-up, exploiting small openings before the goaltender can adjust. This ability is often the difference between a goal and a missed opportunity.
Further, the practical significance of understanding this relationship extends beyond individual skill enhancement. Coaches and equipment managers can leverage this knowledge to optimize player performance by selecting equipment tailored to specific roles and playing styles. For instance, a defensive player whose primary role is to clear the zone quickly might benefit from a stick emphasizing release quickness over raw power. Conversely, an offensive player known for powerful slap shots might prefer a stick that prioritizes energy loading over immediate release. The specific choice therefore becomes a strategic advantage, aligning equipment with tactical objectives. Real-world observations across various levels of play corroborate this, demonstrating a correlation between equipment selection and player effectiveness in specific situations.
In summary, release quickness is an integral component in hockey, significantly impacted by the bending area on a hockey stick. This relationship dictates the speed with which a player can propel the puck, influencing scoring opportunities and overall offensive effectiveness. The challenge lies in balancing release quickness with other factors, such as shot power and accuracy, to optimize performance for individual players and specific game situations. Understanding the nuances of bending area selection is essential for achieving this balance, ultimately contributing to a competitive advantage on the ice.
5. Player Strength
The degree of force a player can generate, known as player strength, is a primary determinant in selecting a hockey stick with an appropriate bending area. A player with substantial upper body strength can effectively utilize a stick with a higher bending area, facilitating maximal energy storage during the loading phase of a shot. This results in a more powerful release. However, a player lacking such strength may find it challenging to fully load the stick, leading to diminished shot velocity and control. Conversely, a player with less strength may be better suited to a stick with a lower bending area, as this configuration requires less force to activate and allows for a quicker, albeit potentially less powerful, release. The effectiveness of the bending area is therefore contingent on the player’s capacity to leverage it.
The practical significance of this connection is evident at various levels of hockey. For instance, professional players often utilize sticks with higher bending areas and stiffer flex ratings due to their advanced strength and conditioning. This allows them to maximize shot power, crucial for scoring in a highly competitive environment. In contrast, younger or less developed players typically benefit from sticks with lower bending areas and softer flex ratings, promoting proper shooting mechanics and enabling them to generate adequate shot velocity. Ignoring this relationship can lead to inefficient energy transfer, improper technique development, and ultimately, reduced on-ice performance. Proper equipment selection is critical for player development.
In summary, player strength is an essential factor in determining the optimal bending area for a hockey stick. Matching the stick’s characteristics to the player’s physical capabilities is crucial for maximizing shot power, accuracy, and release speed. Failing to account for this relationship can hinder performance and impede skill development. The ideal scenario involves a nuanced understanding of player strength, shooting style, and stick specifications, leading to an informed equipment selection process. This nuanced matching can lead to significant gains in on-ice performance.
6. Shooting Style
Shooting style, encompassing the mechanics and preferences of a player’s shot, directly influences the selection of a hockey stick’s bending area. The mechanics involved in executing a wrist shot differ substantially from those employed in a slap shot, thereby necessitating different stick characteristics to optimize performance. A player favoring quick wrist shots and snapshots typically benefits from a stick with a lower bending area. This configuration allows for a faster release, minimizing the time available for the goaltender to react. The cause-and-effect is evident: the player’s swift puck handling combined with the stick’s quick release results in a higher probability of scoring. Conversely, a player whose style revolves around powerful slap shots from the blue line requires a stick with a higher bending area. This design facilitates a deeper loading of the shaft during the wind-up, maximizing energy transfer and resulting in a more forceful shot. An appreciation of the interplay between shooting style and bending area placement is essential for enhancing on-ice effectiveness.
Consider the contrasting examples of two professional players. Player A, known for his deft puck handling and quick releases in tight spaces, likely utilizes a stick with a low bending area to capitalize on scoring opportunities near the net. In contrast, Player B, recognized for his powerful slap shots from the point, would benefit from a stick with a higher bending area to generate maximum velocity on his shots. These real-life examples illustrate the practical significance of aligning equipment with individual playing styles. A mismatch can lead to inefficient energy transfer, reduced shot accuracy, and ultimately, diminished offensive output. Proper equipment selection is therefore not merely a matter of personal preference but a strategic decision with tangible consequences. Proper use of hockey stick allow to better performance and reduce injuries.
In summary, shooting style is a fundamental component in determining the optimal bending area on a hockey stick. Whether a player prioritizes quick releases or powerful shots, the equipment must complement their individual technique to maximize performance. The challenge lies in accurately assessing one’s own shooting style and selecting a stick that aligns with those characteristics. This alignment is crucial for achieving consistent and effective shot execution, ultimately contributing to a player’s overall success on the ice. Further considerations, such as player strength and ice conditions, can further refine this selection process.
7. Puck Trajectory
The path the puck takes after being shot, or puck trajectory, is directly influenced by the area where a hockey stick flexes most. This relationship is critical for players seeking to control shot height, distance, and overall accuracy. Selecting a stick with an appropriate bending area is essential for achieving desired shot trajectories in various game situations. This has effects that are visible in every level of play from novice to professional.
- Location and Launch Angle
The position of the bending area along the shaft affects the angle at which the puck leaves the blade. A lower area tends to produce a lower launch angle, resulting in a flatter trajectory ideal for quick shots and deflections near the net. Conversely, a higher area generates a higher launch angle, suitable for clearing the puck from the defensive zone or shooting over obstructions. The physical location directly influences trajectory.
- Flex Profile and Shot Height
The overall flex profile, including the distribution of stiffness along the stick, influences the maximum height the puck reaches during its flight. A softer flex profile can create a more pronounced upward curve, allowing the player to lift the puck over opposing players or the goaltender’s pads. A stiffer flex profile typically results in a flatter, more direct shot. This profile is crucial when considering shot height control.
- Release Point and Trajectory Consistency
The consistency of the release point relative to the bending area contributes to the predictability of the puck’s trajectory. Maintaining a consistent release point allows the player to control the shot’s height and direction more effectively. This consistency relies on consistent use of the flexing capabilities. Any variation can cause inconsistencies in the flight of the puck.
- Shot Power and Trajectory Distance
The amount of power generated during the shot, in combination with the bending area, determines the distance the puck travels. A higher bending area can facilitate greater energy loading, resulting in a more powerful shot capable of reaching the net from a greater distance. However, this must be balanced with control to maintain accuracy over longer distances. It is beneficial to combine power and a deliberate bending to create optimal distance.
Understanding these facets of puck trajectory in relation to the bending area of a hockey stick allows players to make informed equipment choices. The interplay between stick characteristics and shooting technique is critical for achieving desired shot trajectories and maximizing scoring opportunities. Considering all characteristics and shot conditions allows to have a proper shot based on what is desired by the player.
Frequently Asked Questions
The subsequent queries address common concerns and clarify misconceptions regarding the area of maximum flex in hockey stick design. Understanding these points is essential for informed equipment selection and optimized on-ice performance.
Question 1: Does a lower kick point guarantee a faster shot release?
A lower position typically facilitates a faster release due to reduced energy loading time. However, shot velocity is also dependent on player strength and shooting technique; a player may sacrifice shot power for release speed with a lower area, thus the trade off is significant.
Question 2: Is a higher kick point always superior for slap shots?
A higher position generally allows for greater energy storage during a slap shot, potentially increasing shot power. Nonetheless, the stick’s flex, the player’s strength, and shooting mechanics also significantly influence the shot’s effectiveness; it is best used for players that prefer slapshot.
Question 3: How does kick point location affect stick handling?
The kick position indirectly affects stick handling. Sticks with softer flex profiles may provide enhanced puck feel, while stiffer sticks offer increased stability. This selection needs to find balance to have benefits on both ends of playing.
Question 4: Can the kick point compensate for poor shooting technique?
The bending area cannot compensate for fundamental flaws in shooting technique. While proper equipment selection can enhance performance, mastering proper technique is paramount. Equipment selection can not fix the fundamentals of the players.
Question 5: How does player weight influence the optimal kick point?
While not a direct correlation, player weight often indicates overall strength. Heavier, stronger players may prefer higher positions and stiffer flexes, while lighter players may benefit from lower positions and softer flexes. This is not always true, this relation can change due to players style.
Question 6: Are kick point technologies solely beneficial for advanced players?
No. While advanced players may better exploit the nuances of different flex profiles, players of all skill levels can benefit from equipment tailored to their individual strengths and shooting styles. Younger players are encouraged to practice to better learn how equipment can help their playing style.
Selecting equipment requires an understanding of these complex interdependencies. Careful consideration and experimentation are essential to finding the ideal configuration for a given player and playing style.
The concluding section will provide actionable recommendations for selecting a hockey stick based on individual player attributes and playing style.
Kick Point on a Hockey Stick
This exploration has underscored the critical role that the location of maximum flex plays in optimizing hockey stick performance. The interplay between the bending area, player strength, shooting style, and desired puck trajectory has been thoroughly examined. Understanding this complex relationship is paramount for players seeking to enhance their shot power, release quickness, and overall on-ice effectiveness. Selection of the proper hockey stick involves careful matching of player attributes with equipment design and understanding their play style.
Ultimately, the pursuit of optimal performance demands informed decision-making based on a nuanced understanding of equipment specifications and individual player characteristics. Continued advancements in stick technology will likely offer further opportunities for customization and performance enhancement. Emphasis should be placed on a holistic approach to equipment selection, integrating an understanding of technique, physical capabilities, and the strategic demands of the game. Further research is recommended to improve equipment and to develop players that are aware of their playing attributes.


